What an interesting adventure this year has been! I do not think i have ever gone through so many emotions in all my university experience!! By the end i did not know whether i was coming or going and i just wanted to give up. But, i gained the strength to carry on and although things did not turn out the way i was hoping, i have learned so much. To think that i was originally not going to do the top up year, that sure would have been a big mistake. I feel as though i have learned more this year then any other previous year. Before i always stuck to what i knew best and thought that if i stayed on that path then i would become better at animation, but i was wrong. There had been so many things that i never even thought of trying because i was to worried that i would not be able to do it.
I am really pleased that i pushed myself and tried so many different tasks within Maya. I just thought i would mainly do character animation, but that soon changed to modelling characters which i was not keen on doing but as i was the team leader and no one else wanted to take on that task then i had to. I also done, prop modelling, environment modelling, UV mapping, Texturing, Lighting, Dynamics and Rendering, which i think is a lot, and i had to learn all that this year as well as being the team leader and supporting my team mates. The more i think about things the more i feel like i have learned more than what i would have if everything went smoothly. I don't think i would have touched Lighting, UV Mapping or Texturing, so in a way i am glad that i have a wider knowledge of Maya.
The good and the bad!
Well i shall start off with the bad first just because there was so many downfalls which resulted to an incomplete animation film. I feel like i made some bad decisions along the way this year. I partly feel like i should have asked someone to model our characters for us, as i took some time to make them. Learning new things at the beginning of the year may not have been the best decision. I also wish that Karl had stuck to the roles which he was planning to do which was rigging. I am disappointed that he only stuck to what he knew and did not try to learn new things. As much as he created some nice prop models i also feel like he let us down a little as all the problems started to roll in once he said that he no longer wanted to try and rig, without even testing it out first.
Rigging was the main thing that brought our group down, after Karl did not want to do it we had to find someone else, and as everyone was going to Clym i did not want to add to his list. Laura came on board as she said that she had previously done rigging and that she was happy to do that for us. With the rigging taking far longer than it should have with small problems getting in the way and Laura not being able to put much time into the work due to her job, it damaged our animation. I wish that i had been a little more forceful when i had said to her that we could find some one to do the blendshapes as she had her own animation to do, but she was confident to do so, and the best result was devastating. I was in tears and could not believe what we had ended up with. The rig and blendshapes did not look like much time was used to make our characters move. For me to have waited all year to bring my characters to life was the most upsetting thing i have experienced in animation so far.
The issue with my laptop breaking was unpreventable, my Mac had a manufacture problem and there was nothing i could have done regarding this, it was just another thing to add to the list of problems. This pretty much only effected me and made everything harder on me as i then had to travel to Ryan's pretty much everyday and traveling from West Sutton to New Eltham was very tiring. This was so that i could use Ryan's desktop that he brought from university last year. This was a big life saver for me despite all the traveling back and forth.
As i think enough has been said about the bad as there would be an endless list i need to think about the positive things that happened considering all the problems. Most of the positive things is mainly a reflection on myself. I have gained more confidence now that i have been a team leader twice in two years, although this animation fell through, some things just can not be helped. I really pushed myself this year more then i ever have before. Although i wanted to give up i still carried on being strong and took on new tasks that i had no idea on just so that i was not wasting time, and trying to get our animation pushed forward instead of it going backwards. I am really pleased that i have tried a mixture of things. I think considering all that happened i was still able to produce a lot of work this year and i can walk away being happy about that.
As a team, and a small team at that! We done really well to get as much work done as we did. When i look back at 'The Deep' and how many team members there were to mine, i just thought there was no comparison to whose is going to be of a higher standard. But for only to have three members and pretty much have had everything complete apart from the animation, i think that is really good. I sometimes thought to myself how can there be enough rolls for each person in 'The Deep'. I took on board about 7 different rolls and managed to complete them all, although the standard may not be as high to them as i had to move quickly onto the next task. Our team communicated well and had many ideas to share with one another, there was never any confrontation and issues that needed to be fixed.
If i were to do this again, there would be many changes. I would mainly want to see previous work from someone who said they wanted to be a character rigger of texturer as then i could have seen the quality of work myself before them jumping on board. I think i would have changed the story as i think we gave ourselves a bigger challenge then what we realised. As our teachers always say, keep it simple and i thought we were but i now look back and think, i don't think we made the best choice.
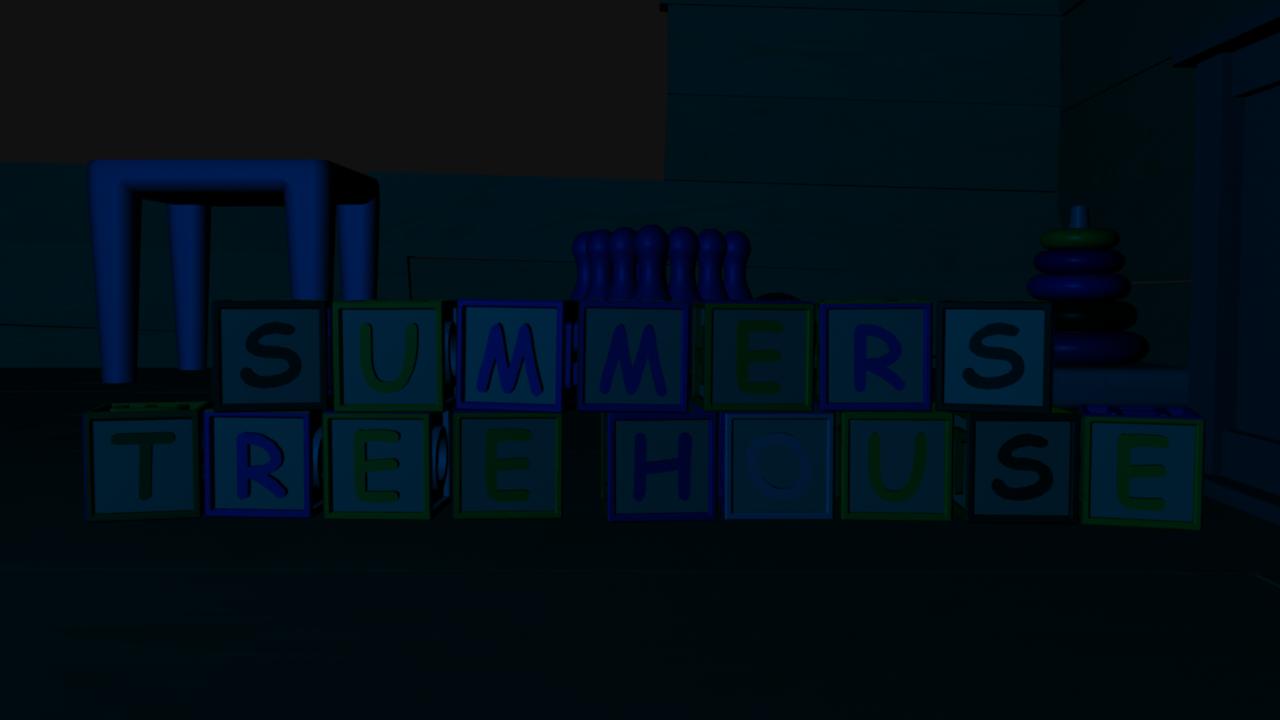
I would have designed Summer differently as giving her a dress was not a good idea, it was going to be difficult to animate the dress when making our film. I would have changed her so that she had shorts with long tights.
Well this year sure has been challenging and all though the end result is not a happy one for me i am still pleased that i created lots of work in different areas of Maya. I really enjoyed character and prop modelling and am thinking of taking this on board as my main skills as i think i am stronger at modelling than what i am animating.
Saturday, 18 June 2011
Thursday, 16 June 2011
Character animation
Well i managed to get some animation done although sadly there is not a lot of it. I mainly wanted to focus on facial animation so i thought it would be best to stick to this. From the storyboard i choose a few face expressions which has the most movement. I first had to get used to the new character which i found through creativecrash.com.
Here is my first pass for scene 23. Here i have placed her into position and key framed the timing of the head movement. I have begun to start key framing the eye for for this pass i have made her open one of her eyes as she previously had them closed as she was scared of what was coming towards her.
For the second pass i have focused more on the eye movement when Summer moves her head, making sure the timing for her blinks are current. The double blink is to show that Summer is making sure that what she is seeing is real.
For pass three i have placed her into the tree house and ever so slightly changed her eyebrow movement as i know that the eye brows can send out a message before the attack to what the person sees happens.
The first pass here was to key frame the timing of the head movement and getting Summer to smile at the end. I made the smile a little to large which makes her cheeks look slightly strange.
For the second pass i added a little tilt to her head which gives her a relaxed posture as she is relieved to find that it is only Pandy who was trying to scare her. I also lowered the smile a little but opened her mouth slightly which creates a nicer smile.
For this scene only the eyes and mouth have been roughly keyed out so that you know what is happening but also needs a lot of work to make more convincing.
The second pass i have focused more on the eyes and eyebrows as they are the most important part of the expression for portraying Summers emotion.
Here i have added an extra small head movement as the head movement looked to robotic.
Friday, 10 June 2011
Meeting with Dan about character animation
I spoke to Dan today regarding the issue with the character rigs. At first Dan did not think that the characters would have wrong with them and that we should be able to get past it, but once i showed Dan a short clip of Summers mouth movements and some basic poses he soon came to realise why i had not done any animation. Dan agreed with me that it would have been unfair to try and animate with the characters as they would show poor animation which would reflect badly on me. Dan asked if we tried to find someone to help but sadly was unsuccessful in doing so, like i had said in an eariler post, Clym did help us slightly but was unable to complete the job for us.
After a while Dan came up with an idea of downloading a character which already has a rig which looks similar to Summer, so that meant trying to find a young girl. Dan had to go and ask Mike if that would be okay as he is the head leader of the course. Dan said that this would be a good chance for me to try and get some animation done even if they are only short clips. Dan also said that no one would know the difference between the two characters and the audience who would watch the animation would not know if i had modelled the character or not.
The only thing about this now is that i only have a week to try and animate whatever i can which is going to be tough as i currently trying to sort out my three folders and i know they will take a few days to do. I feel like i am rushed off my feet, i have tried so many new things and done so much that the character animation has got pushed aside a bit. I shall see what i can do in this last week and hope that i can get some character animation done.
Thursday, 9 June 2011
More Dynamics
When doing the Dynamics for Ryan and Karl's name i thought that it would be best to have them slightly different from mine so that they did not all fall exactly the same. Ryans name has a slightly less bounce than mine where are Karl's has more movement.
Karen Block Dynamics
Now that the end scene has been completed, i have now started to experiment with Dymanics, which is another thing with in Maya which i have not tried before. I first had to create extra letters to make the team members names so that i could use the blocks as a way of making our names appear when the credits role. I thought of this when i was doing the torch animation as i thought this would be consistent with the animation.
As i had not done dynamics before i done some research online to see what tabs did what so that i would have a small knowledge on what to do. I first had to select all the blocks and turn them into active rigid bodies. The ground plane had to be a passive rigid body so that the plane would not react to the blocks and then i had to add a gravity field so that the blocks could fall.
Here is the very first test i ever done. You can see the floor plane in this which i never thought about until it was rendered. To solve this i made the floor plan higher so that the blocks would be higher on the screen and made the plane transparent.
Now that i had solved my first little problem i now had a new one. Although the blocks bounce quite nicely from the ground, they fall down rather slow, which looks unrealistic as the weight from the blocks would make the blocks fall down quicker.
I changed the height of some of the blocks so what they would not fall in a straight line as they looked to robotic and tidy. I wanted the blocks to fall down a little more randomly as if we were to do a real test, all the blocks would fall at different speed rate. Now that i had done that the letter 'N' had to much bounce and would now rotate backwards as it bounced. This actually gave me an idea to try and have the cube the wrong way so that when the cube would bounce it would rotate to the letter i need.
With the idea in mind tested, i liked how there was something more exciting happening to the blocks, but it also took a while for the movement to happen which i was not keen on. So i thought i would take that idea out, but i am glad i tried it out.
And here is the final one, as you can see i have made the speed of the blocks come down faster which looks more realistic and there is now only a small bounce in the blocks as there would not really be much movement as they are made from plastic.
Tuesday, 7 June 2011
Prop animation
Although it seems highly unlikely that i will be able to do any character animation, i can still do some prop. With me sorting out the lighting for this scene, i know feel that i can start the torch rolling across the floor.
With the first animation test you can just see the torch going from left to right, there is nothing all that exciting about the movement, it is all of the same speed which i think needs to change as it would not realistically move in that way.
For the second test i have now slowed down the movement near the end but i am now starting to think that it would look quite nice if the torch goes off the screen altogether.
This test now shows the torch going off the screen but the movement does not look right, it does not look as though it is curving round, it seems to just be moving to the right in a straight line.
Here you can see that the animation is slowly coming together but there is still changes to be made near the end of the movement.
The last test you can now see that i have sorted out the timing of the torch movement so that it is now slightly slower and the the torch light goes completely off screen which will now make it easier to start the end credits from.
Saturday, 4 June 2011
Prop Horse animation
I thought it would be nice to have the rocking horse slowly rocking back and forth in our animation as it would be windy outside in the storm, and it is highly likely that wind would come into the tree house. Having the rocking horse slowly moving would also seem slightly scary as i can imagine having creaky sound effects creating a slightly unsettling atmosphere.
I had to redo the rocking horse as when i first animated it, i forgot to move the pivot point to the bottom of the horse, so the movement looked rather messy. Once i had changed this, the rocking horse was fairly simple to do.
I have also done a crayon falling off the chest of draws as the wind would be able to effect many things in the treehouse.
Friday, 3 June 2011
Lighting
As i had now figured out the night lighting it was now time for me to try and get the light for the torch. I was finding this rather difficult for a while as a spot light is different to an area light.
 I could not seem to get the intensity of the light to be all that strong, although it was up to the highest on the bar, it still was not strong enough. I started playing around with other tabs to see if they made any difference but they were only making things worse. After a while i had to ask James and he told me that i could just write in the number i wanted for the intensity instead of pulling up the bar tab. It was something so easy and simple but as i was new to this i did not know. That is one thing i have already learned about lighting.
 The main problem i was having here was the light which is going behind the blocks. I did not understand how it was going through the object and going onto the wall. At first i thought that if i made the light beam thinner then hopefully that shall make a difference but it did not. I had to ask for James help again after a while and he asked me how i was rendering out as that would make a difference to the lighting. I tried different ways of rendering out the image but that was not making any difference. After a while i finally solved the problem, i used the penumbra tab down which made the light much softer and have a blurred edge as the light was far to sharp along the edges.
Lighting is rather interesting, i must say that it is fairly difficult and can be very time consuming when you do not understand the meanings of the strange tab names. It seemed to me that was my main issue, why do they not have simpler words for the tabs? I think i can happily say that i would not take on lighting as a profession, but i am interested to learn more. Lighting is very important to an animation and can send out many emotions. This has been a great little learning process for me and i am sure to do more in the future.

This is the end result to my lighting which i think has turned out really well, although i think i could change the light beam as i think the light is spreading out a little to far.
Thursday, 2 June 2011
Finding Stength
Although there has been so many problems lately, that has not stopped me doing work. I have lately been working on some lighting which is something i have never done before. I thought it would be really nice if i could try and get the end shot done and then try and start with the credits.
The end shot is where Summer realises that is it only Pandy who is playing a trick on her and when she goes to grab and hug him, Pandy drops his torch.
 I done a series of tests to try and sort out the night time light. It was rather difficult to try and get right as we do not want the light to be to dark or we wont see any detail to our props, but we also have to remember that you wouldn't be able to see much in the dark.
 I tried putting a colour into the light but this was far to blue, although i think a hint of blue would look nice, a bit like the night time in Pixars UP. This was to bright and needed to be toned down.
 Here i have started to get the right kind of lighting but everything looks rather flat, there was something missing to make the objects stand out a little more.
 I thought that the shadows were turned on, but by default i found that you have to turn them on yourself and once i had, this was the result i got. This is much more realistic to what i had when i first experimented with lighting. I still think that it could be slightly darker, but i am definitely learning. I tend to find with lighting that you need to experiment with the tabs to see what they create then by knowing what to do straight away.
Wednesday, 1 June 2011
Rigging Help
After the character rigs fell through i tried asking around to see if anyone might be able to fix the problems that we have been having. As i know we are now near the end of the term everyone is now stressed with getting there own work done. I messaged Clym to see if he might be able to help. The next day he replied saying that he would see what he could do and within half an hour he had changed the smile blendshape control. The difference between Laura's smile to Clym's was massive, i was so happy with what Clym has managed to do and clarified that there was nothing wrong with my modelling as Laura said that there was to many vertexes to do the blendshapes properly, but Clym never found that to be a problem. Sadly Clym said that he would not be able to do anything more for us as he has so much work to get on with.
 Here is The blendshape which Laura done for us, this is the smile to its highest point. As you can see this looks incomplete, the cheeks do not move with the smile so her cheeks now look like they have dropped.
 And here is what Clym done for us within half an hour, as you can see, the smile has been completed to a much higher standard. The cheeks move with her mouth which makes a massive difference to the results.
This actually made me more upset knowing the standard that my characters could have been if only they were done properly. I felt so passionate about my characters and as it has come to a dead end i also feel the same.
Monday, 30 May 2011
Rigging Problems
Problem, after problem, after problem. Ever since my laptop broke everything has gone downhill. I know that the rigging was taking far longer than what it should have. Silly little things that Laura kept mentioning that Ryan and I had to fix was not really much of an issue as they did not take long to solve. Laura was going on as if they were a massive problem but i just did not see it that way, but as i have not tried rigging before i guess i do not know how the small things can effect the rig. Anyway, with them solved, i thought okay well they have been solved which will mean our rig will be to a higher quality than what it would have been before. Karl and i shall have to work extra hard for our animation to be completed but i am sure we can do it.
Once Laura had posted up the link for the finished rig of Summer, i was really excited to work on her. Karl said that he would do Pandy and for me to do Summer as i wanted to work more on facial animation. I started to quickly test Summer and tried to get used to the rig but was finding many many problems. Even placing Summer into basic positions was nearly impossible as the mesh was constantly tearing and deforming. As most of the animation on Summer was going to be through her facial expressions i thought that we still might be okay to do our animation. But once I started posing Summers face with the blendshapes I knew we were in trouble. The problem is that the blendshapes for her facial expressions look lumpy and distorted like they are incomplete, part of her fringe was even attached to the facial blendshape controls, meaning everytime we moved the mouth, the fringe would move up or down with it. This is distressing because we are running out of time to get any animation complete, and with the current condition of the Summer rig I feel there is no way we can create any acceptable animation for our film. This has been quite upsetting for me as i have been eagerly waiting all year to get to this stage so that I can see the character that I designed and made come to life, and now that is not going to happen. What makes it worse is that i previously suggested to Laura that we can find someone else to finish the rig and blendshapes for Summer so that Laura can focus on her own work, but she insisted that she would be able to get it done for us, and now I feel incredibly let down as we are not going to be able to get a single shot finished.
As animation was originally going to be my main folder, i am now lost in what i can place in my folder. I do not even want to do test animation on Summer as the animation may be seen as a bad reflection on me. After all the problems that have happened lately i really feel like giving up, i am finding it very hard to have any strength right now to continue with this project. I never saw this happening and i am gutted that we will not have any animation to show. I now need to try and speak to Dan to see what he thinks about the situation. Although i feel like i have no strength right now, i can not left this defeat me as i need to stay strong for my other team members and as i am also team leader i still need to be strong about our animation.
Friday, 27 May 2011
The stress
Okay, so this week has been the most stressful so far, without having my laptop i have felt quite lost about trying to get some work done. I borrowed a mac from Ravensbourne for the weekend but found out that Maya had a network license so i could only use Maya if i was in the building which is not what i needed. I had no idea how i was going to do any work whilst my laptop was in for repairs. Our group does not have the time for any time to be wasted let alone a whole week. Ryan said that he has a desk top which i can use if i wanted to. At first i was a little unsure as he lives 1 hour and 45 minutes away from me on trains, but i came to realise that i can not afford to waste anymore time. I started traveling to Ryan's everyday just so that i could get some work done, this was really draining as i had to do so much traveling back and forth. But i was able to get work done, so i guess that is all that matters at the end of it.
I got my laptop back one week later like they had said and i was so happy to get it back, i had never been so happy to see my laptop just so that i could get on with some work. From the Apple store i went straight to uni to see everyone so see how they were getting on. As i went to try and load up my work, my Maya was not opening, it said that the license has run out, and all i could think to myself was great, now what?? I started to ask everyone in our class to see if they had Maya 8.5 which no one did, i guess i can't blame them, it is an old programme, but i can not upgrade to a later version as my mac is to old. A guy at the I.T desk said that i can upgrade my mac if i know anyone who has the original desks from there Macs. So i tried doing that but that was no good, it did not work. I tried downloading it, but there was none, even through torrents. My last hope was through Dan Dali. He said that he may have it, but found out two days later that it was on for the PC. All my hopes were gone, out of all the programmes i needed to work, Maya was the only one which was affected. I have really started to lose hope, i really feel like everything is against me not to do any work. I don't see how all this could happen over such a short period of time and near the dead line. I am frustrated and feel like giving up. The only choice i have now is to go round Ryan's to try and do all that i can before deadline. I know we are not going to complete our film, which really upsets me, but i guess it is now time to focus on our folders.
Dan told me that i can be given a short extension from all the problems i have been having of an extra 4 days. But my aim is not to use it, although i have had so many problems this would not matter if i was in the industry and i want to push myself to get all that i can done. Although all hopes are low at the moment if i can push myself as hard as i can then i hope to get most of the work i was planning to get completed. I know i shall be unsuccessful in some of aims, but hopefully my teachers will understand and realise that i have still pushed myself to get all that i can done.
Friday, 20 May 2011
Laptop broken?
Okay so one of the worst things that could possibly happen to a animation group has happened to us. My laptop has broke, i have no idea why, what it is, or how it could have happened. I was doing work fine earlier and when i took a break for a while and returned the screen was not working. I could still hear my laptop running but i had no idea what had happened to the screen. I turned my laptop off and rebooted it but nothing. So i thought maybe my laptop has just over heated and that i need to leave it alone for a while. I returned a few hours later and there was still no response. I started to freak. Has all my work gone?? If it has then our group is really going to struggle, as if our group has not found it hard enough with only three people but for this now to happen, we just do not have any time to waste!! I have most of my work backed up, but the last week or so is not. What am i going to do?
I took my laptop to university the next day and i spoke to Dan Dali regarding the issue, he told me that it just sounds like the screen has gone and that i should be able to hook my laptop to a PC screen. Of course, i started to think of why i hadn't thought about that myself. With Dan calming me down a little i thought, well i still need to go to the Apple store and take it in for repairs. Repairs? Oh wait what about me having a laptop, i wont have one and what about the cost? I soon started to get worried again and felt like i was having the worst day. I booked an appointment with Apple to see them for 4pm today, just have to hope for the best with this. After a while i spoke to Dan and he was helping me the best he could. We were running around the university trying to find a cable to connect to my Mac as my Mac is now rather old and finding the cable started to be a bit of a mission. In the end we finally found one but there was nothing coming up on my screen. Dan then said that it might be the graphics card which has gone, and my jaw wanted to hit the floor, the day was just getting worse and i felt like i had no time to worry because i have to help Ryan, Karl and James with there work making sure everything is going on track. I felt like my head was going to fall off.
Well i guess i just need to wait and see what happens when i go down to the Apple store, wish me luck because i think i am going to need it.
Thursday, 12 May 2011
Prop shaders
To help save Ryan time with texturing i thought it would be worth while for me do texturing using shaders as a lot of the toys should look as though they have been made from plastic.
 For the Xylophone i wanted them to look as bright and eye catching as possible, as they always attract children. The bars have been textured to look as though they are not really made of plastic but of a metal as they are used more to create music. There is a slight reflection as i know that the metal with a paint coating would not really give off much reflection.
 Here looks like a young child's plastic table. Childrens furniture can be made of many different types of plastic, was it was hard to know how to create the right look. A lot of it comes down to the reflection of the object, and you would not be able to get much from a table, so i made sure to keep that low.
 I made the bowling pins have a higher reflection then the previous objects as i thought they would be made from a heavier plastic. Bowling pins are usually very shiny but i know that a child's toy version would be seen differently.
 The tower of Hanoi has been made to look like it has been made of a very shiny plastic. On the base i have made the refection quite high so that you could see the rings.
Most toys are made from a PVC plastic but can be used in different ways, toys can be made using a soft PVC to a hard PVC. So i have tried to show this through my shaders. I do not know a lot about plastic so it is hard to get each toy spot on.
Sunday, 8 May 2011
Shaders
James has been doing a great job on sorting out the lighting for our exterior shot but he is finding it rather hard as nothing has been textured as of yet. So i thought it was time for me to step in and try some colour shaders. At first i thought it would be a good idea for Ryan to texture the house, but after a while i thought to myself, there is not need. Ryan needs to focus on the objects that you will be seeing close up, not ones from far away. So i have now started to texture props. I thought i should start off with the house first so that it would help James to get the lighting right for the scene.

As you can see i have started texturing a few of the other props as well as the house as it is easier to just hand over the file to James once, instead of keep going back and forth. I was a little unsure on what the colour scheme should be for the house, but i thought as i have modeled a western house, i would be hot weather so i thought using a cream would be ideal. I tried having the tiles brown but they looked a little old so i used a brown/red which shows that the house is fairly new.
 I selected the face of the window, attached a new material and went in the material attributes, then found the special effects window, and i adjusted the glow intensity. This was so that the window look as though there is a light on, without actually having to place in a light.
 Here i have now coloured in some of the windows to show that the curtains have been pulled to. I have also played around with the glow intensity on different windows as different curtains and blinds would show different light coming out.

Here is the result of what i done with James lighting. He has also included a occlusion layer which really helps to see depth of the house. From how it looked with no lighting to now is a massive diffence, James has put in some really nice shadows from the slide which helps to give the impression that there is light from the house. I think the glow intensity needs to be raised up a little and once Ryan has textured the treehouse then this shot should be ready to go.
Please note that for this i have only placed in the old version of the slide and sandpit as this was a test to see how the layout and lighting looked, this is not how the final will be presented.

As you can see i have started texturing a few of the other props as well as the house as it is easier to just hand over the file to James once, instead of keep going back and forth. I was a little unsure on what the colour scheme should be for the house, but i thought as i have modeled a western house, i would be hot weather so i thought using a cream would be ideal. I tried having the tiles brown but they looked a little old so i used a brown/red which shows that the house is fairly new.
 I selected the face of the window, attached a new material and went in the material attributes, then found the special effects window, and i adjusted the glow intensity. This was so that the window look as though there is a light on, without actually having to place in a light.
 Here i have now coloured in some of the windows to show that the curtains have been pulled to. I have also played around with the glow intensity on different windows as different curtains and blinds would show different light coming out.
Here is the result of what i done with James lighting. He has also included a occlusion layer which really helps to see depth of the house. From how it looked with no lighting to now is a massive diffence, James has put in some really nice shadows from the slide which helps to give the impression that there is light from the house. I think the glow intensity needs to be raised up a little and once Ryan has textured the treehouse then this shot should be ready to go.
Please note that for this i have only placed in the old version of the slide and sandpit as this was a test to see how the layout and lighting looked, this is not how the final will be presented.
Friday, 6 May 2011
Layout
I was asked by James if i could place everything into the exterior scene so that he could start working on the lighting for us.
 When i first tried to import the house, i was having many problems. If you look at the image you can see that many of the faces are missing. I tried importing the house a few times but the same thing was happening each time. I thought it might have been Maya playing about as i have known for that to happen before so i quit everything, reloaded and still no improvements. So the only thing i thought i could do was look at the house file scene and see if there was any problems there which i could figure out. Everything seemed fine, so i was starting to get a little confused, but i suddenly thought to myself, i haven't deleted any of the history since modelling. So i deleted the history and re-imported the house and everything was fine. What a relief, although i have not had to do this with any of prop i have modelled i think this is something i shall have to keep in mind from now on.
 Here i have started to lay out the props for the scene. i duplicated Ryan's fence to create a square so that it would look more like a garden which was inclosed to the house. There was no other place i could really have the house as we wanted to make sure the light from the house would be looking onto the treehouse so that the audience would know that her parents are keeping an eye on Summer through the window.
 I was unsure on where to place the slide and swing as i thought about what the audience would see. So at first i had the props facing me (or the audience) but after a while i knew that would not seem realistic, so i thought it was best if i rotated the props so that they were facing the house, which again would be easier for the parents to see. I do not think anyone would have the slide and swing facing a fence.
Wednesday, 4 May 2011
Texturing
As most of my modelling has now been completed and there is no animation that i can do as of yet, i thought i should try and learn some new skills so that i can help Ryan out. Although i will not be able to do texturing to a high standard i thought i could do some props which are not to important to the animation. This will help Ryan so that he can focus more on the important objects and take more time over them whilst i can learn the basics of how to texture.
So i have been given a few books to texture to see how i get on and i must say that it is not as hard as what i thought it would be although the texturing is only simple.
 I placed the UV map into photoshop, i had to make sure that i would be colouring on a separate layer as to the UV map.
 As these are childrens book, i used flat bold bright colours to make the books stand out more. Using tonal colours would have been a waste of time as they are not really going to be seen. I had to make a new layer so that i could place the writing on, i had to try and come with book titles that had not been used before as that may have been seen as copyright.
With my UV map coloured, I had to export the colour layer as a Targa file into Maya and then i just needed to apply it to the object. I had to make sure that i had turned off the UV map layer or that would have shown when applying the texture.
This was fairly simple to do although colouring the white for the pages was fairly difficult as i had to make sure that the white would not go onto the hardback of the book.
 Here is what i have managed to do. I think they have turned out pretty well. I know this is only very simple texturing but this is still something i had no idea on how to do. I already feel more confident about being able to texture. If Ryan asks me to try and texture anything else then i shall happily help him.
Saturday, 30 April 2011
Tree House UV Mapping
Ryan has a lot of UV mapping and texturing to do this term and I'm worried he may be overwhelmed with his workload, we were speaking to Dan and we agreed it would be a good idea if I learn how to do some basic UV mapping to help take some of the pressure off of him.

As it is my first time UV mapping I was a little unsure about how well I would do as it has always seemed like a complicated and technical role, but Ryan showed me the basics so I have enough knowledge to get started with the work. i tried UV mapping in the more accurate way where you make a projection and cut the UV edges to unfold them in the Texture Editor, but I found it too difficult crashing straight in doing so many new and complex tasks, so Ryan showed me a slightly easier method called Automatic Mapping which unwraps and creates UV maps for the object automatically.

I took on the role of UV mapping the interior of the treehouse, I had to create the UVs for each of the wooden planks which was easy enough, but because there are so many planks it has taken a very long time to do.

After I made the UVs for each plank I assigned a Lambert material with a black and white checker shader assigned to it, this is so you can see if the UVs are working correctly, if the checker pattern looks stretched or distorted then that means any textures that are applied to the object will also appear stretched and distorted, this is important because any problems like this have to be fixed before the UV maps are turned into a snapshot for texturing.

In the UV texture editor theres a useful setting that allows you to be able to see the UV edges which also appears in the perspective or orthographic view that you are using.

This screenshot shows the treehouse including the roof fully UV mapped and ready to be textured, it took a while to finish and I have to admit is incredibly boring and not something I particularly like to do, but as long as it's saved Ryan hours of work then I'm happy to have helped.
Friday, 29 April 2011
Final Xylophone

From my previous post the Xylophone has completely changed. I am really pleased with the way this has turned out. It looks just the way i drew it. To create the head and tail i used the create poly tool and drew the very rough shapes. They did not look to great at first and i had to add more vertexes so that i could make the shape nice and smooth.
When modelling the tail, i had a happy accident happen, where the tail goes near the middle you may notice a slight wave in the tail. I never meant to do that but once i saw it i thought it looked really good and made sure i made it look the same on the other side.
Where i was going to have the screws inside the drill holes of the bar, i thought it would be safer if i placed a little round plastic cover which is child friendly.
Wednesday, 27 April 2011
Xylophone
 When making a idiophone ( the single bar ) i had to make sure that there was two holes so that the screw could then be placed later on. With one bar make i duplicated it and make each one smaller, for higher and lower pitch.
 The mallet was rather simple i just used a sphere and cylinder and place them together. I just need to attach them together for them to become one object.
Here is what the Xylophone is roughly looking like. I could use this but i want to create the fish one like i designed a while ago as it has a lot more character. So i now just need to model the fish head and tail and place them on either end.
Sunday, 24 April 2011
Final Tower of hanoi
 This is the finished version. Now that everything is placed together it actually looks pretty good. I think using shaders for this toy will look pretty realistic, as we could have some reflections to show that the toy is plastic.
The tower of hanoi
 Modelling the Tower of Hanoi was one of the easiest props i have made this year, nice easy and simple to make. I used a torus to create the rings which goes around the shape and duplicated that and just made them bigger.
 For the base all i needed to do was use a cube and flatten it a little and used the bevel tool to soften the ages. For the pool i used a poly cylinder and used the scale tool wider the bottom and thin the top. Place them together and you have your toy.
Final House

Here is the final version of the house. From the previous post, there has been a few changes. I added the tiles like i said i would which i really think brings the house out, if the tiles had just been textured on as a plane surface, i think the house would have looked rather dull. I just used a plane and shaped that into a tile an duplicated that to complete the roof. I also made the smaller roofs a little more realistic by extruding the middle part in to form a triangle. I nearly forgot to put in a drain pipe for the waste until Ryan said about that, and i also added in a mat by the door. They are only small things, but they are the things which can really make props stand out.
Friday, 22 April 2011
House Modelling
As Mike said about a month or so ago about modeling a house i thought it was now time that i did that. We only need the back of the house as that is the only part that you would be seeing so there is no need to make the house higher poly or even waste time in modeling the other sides as it will not be seen. So i have taken a look into west end American homes because they visually look more interesting to what we have here in England and they normally have a big garden which can have a tree house as that is something which is not popular here in the U.K.
 So to the left are some images from the net to help me model the house. I started with a cube and started to add edge loops where i wanted to place the windows. I also deleted a couple of faces so that there could be a small porch which will be supported by stone poll.
 Here i started to model the door and then i need to make another window next to the door which will be the kitchen window. The roof was easily done by using the extrude tool, and making more edge loops to make the windows. From here i need to make the roof tiles as i think they will look nice if they are modeled separately and lined up across the roof.
Tuesday, 19 April 2011
Finished Heart Cushions

Here i decided to make two heart cushions in the end, one for Summer and one for Pandy. Pandy has the smaller one as he is only small himself. You can not see from this render but Summers cushion does have the indent to it. I think they will liven the tree house more as everything else seems a little to square.
Monday, 18 April 2011
Heart Cushions
 Modelling the heart cushions went a lot smoother as to what i thought it might. I was a little unsure on how to start modelling. So i started in my usual way which never seems to fail. With a plane and then work my way from there. I made the rough shape and then extruded it so that the heart was thicker, from there i added 4 edge loops so that i could then begin to make the flat shape into a curves.
 Here you can see where i am moving the vertexes to start creating the curve shape to which a cushion should have.
 With the top and bottom of the heart curved, i then needed to curve around the edge of the cushion to softer everything. I mainly just needed to move to middle vertexes outwards.
 Here you can now see that the flat shape it once was has now changed into a soft cushion. The only thing wrong now is that i thought it never really looked like Summer has sit on it before, as there would be an indent to show weight from her body.
 I have been experimenting with the vertexes to try and suggest that summer does sit on the heart cushion, so now you can see a slight indent to where she would have been placed. This may not really be seen in the animation very well but it is something that i know has been done. It is sometimes little things like this that can make an animation that extra bit special.
Thursday, 14 April 2011
Finished Rocking Horse
As i had previously removed all the lines from the rocking horse i now had nothing to go to make it smooth round the edge. I was trying to figure this out for a while but was just clueless so i asked Karl if he may know of any way to try and fix the problem as i know he is fairly good at using the smooth tool. Karl added edges to the shape again as there were no lines for the smooth tool to work. The edges had to be created from the previous existing vertexes which from there could then be smoothed.

Here is the finished rocking horse. I am really glad that Karl was able to help me fix the problem i was having and i now know not to delete any lines until the model is complete and then i can go ahead and do that. Now the rocking horse looks to a much higher standard and still looks as though it would have been made by her dad which i think could be really nice once Ryan gets to texture it.

Here is the finished rocking horse. I am really glad that Karl was able to help me fix the problem i was having and i now know not to delete any lines until the model is complete and then i can go ahead and do that. Now the rocking horse looks to a much higher standard and still looks as though it would have been made by her dad which i think could be really nice once Ryan gets to texture it.
Sunday, 10 April 2011
Rocking Horse
 When modelling the rocking horse i thought it would be best to start off with the base, starting off nice and easy. To the left hand side you can see an image of a rocking horse which i thought was the perfect shape to class off as Summers dad making the horse for her.
 With other models i have created i started off with a plane, but i was having a few problems as i had put in way to many edge loops and when trying move the vertexes to make the shape, they were starting to fall onto of one another and it started to become very messy.
 Here is how this was working out, as you can see everything is starting to become messy around the horses mouth.
 So with that i started over and made one with less edge loops, even though i had less i was still having difficulty. So i then had to start moving every single vertex which was taking quite some time to do but never the less the form was taking to shape.
 You can now see that i did manage to create the horse, but there was so many lines that i thought it would be best to delete them so that the horse only have a few faces to him.
 Here is now the horse came out. I was rather pleased that i managed to get the shape considering the problems i was having. The only thing about the horse now is that it is not very smooth, and looks slightly dangerous. At first i thought this might be a good idea as it looks rough like it has been hand made, but i also thought that is was a little messy. So i now intend on going round the shape and smooth it off, which can also seem like the father would have used sandpaper to give it that effect.
Subscribe to:
Posts (Atom)